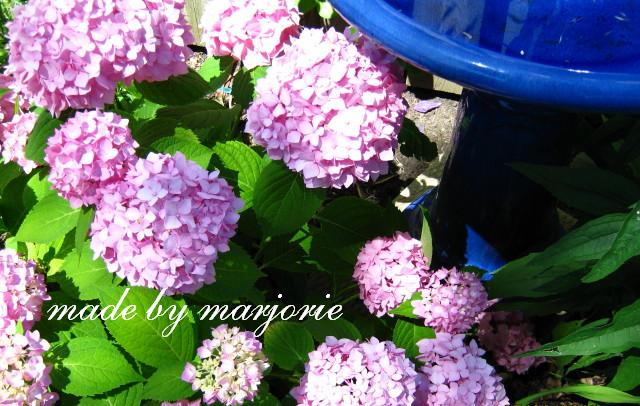
 Here's a handful of flowers from my yard. I don't have much time for gardening these days, but thanks to my mom and mother-in-law - who have shared cuttings from their own gorgeous gardens and in most cases, even planted them for me - I have some really stunning plants that are bursting into bloom now. I really like my garden to be filled with plants in shades of pink, white and green and this bouquet showcases some favourites: hydrangea, hosta, ivy, lily, and some foliage from my bleeding heart bush that blooms in spring, and whose flowers have now faded. Beautiful!
July flowers
Here's a handful of flowers from my yard. I don't have much time for gardening these days, but thanks to my mom and mother-in-law - who have shared cuttings from their own gorgeous gardens and in most cases, even planted them for me - I have some really stunning plants that are bursting into bloom now. I really like my garden to be filled with plants in shades of pink, white and green and this bouquet showcases some favourites: hydrangea, hosta, ivy, lily, and some foliage from my bleeding heart bush that blooms in spring, and whose flowers have now faded. Beautiful!


Mom's birthday: White Chocolate Cloud Cake
 Sometimes we want a classic chocolate cake for a birthday celebration, but sometimes it's nice to go with something a little lighter. Last week we celebrated my mom's birthday and she asked for something with strawberries. So of course I went on a hunt for the Perfect Cake.
This White Chocolate Cloud Cake turned out fabulous. It's from one of my favourite dessert cookbooks, Another Cup of Sugar by Anna Olsen. I swear I have never been disappointed by this book. Every recipe turns out great. The Lemon Ice Cream from that book is TO DIE FOR if you are a diehard lemon gelato lover, as I am. I made it to go with this fluffy cake and they were both delicious. The cake is flourless and is made of mostly egg whites and melted white chocolate, which causes it to rise dramatically(kind of like a souffle) and then fall down, leaving a nice hollow which is then filled with vanilla whipped cream, fresh strawberries, and white chocolate curls. It was light and sweet - just right for a hot summer day.
Happy Birthday, Mom! Let's definitely keep this recipe on hand with our other favourites.
Whose craft is this, anyway?
I pulled out my sewing machine the other day to sew some pillow covers for our patio furniture. Ronan was busily playing on the same table with his cars and crayons (the pictures on the table are ones he has drawn of cars on race tracks). Pretty soon, the scene looked like this:

Note the green truck parked between the sewing machine and the pincushion.
 Apparently, my cutting mat makes a great race track...
 Before I had a little boy, I had no idea you could combine crafts and toy cars!

Note the green truck parked between the sewing machine and the pincushion.
 Apparently, my cutting mat makes a great race track...
 Before I had a little boy, I had no idea you could combine crafts and toy cars!
Beach bound bag

It seems like everyone I know is going someplace warm and sunny, or just coming back from someplace warm and sunny. Cuba...Dominican Republic...Mexico...Florida. You get the picture. At eight months pregnant (and counting down the weeks!) I am definitely not going anywhere. But all the tanned, happy people around me are radiating sunshine these days, and I'm just enjoying the relaxed vibe.
My cousin and his girlfriend are heading south for a week's vacation, and she needed a new beach bag. So my mom obliged by making this pretty pink striped bag.

It folds flat for easy packing, but has plenty of room for towels, sunscreen and all the trashy novels and magazines a girl can read in a week. Plus, a handy pouch for small essentials like lip gloss and sunglasses. Maybe next year I will need a beach bag before I jet off to some sunny resort...
Handmade Christmas
Just a few things that will soon be wrapped and put away until Dec. 25...
 :: nearly finished earflap hat for a certain little cutie (pattern from Last Minute Knitted Gifts).
 :: my famous brown sugar shortbread
 :: Eleventh Hour Scarf
 :: Cowgirl Cookies from Bakerella
And a few more small projects that will be ready just in the nick of time. Happy holiday crafting!
 :: nearly finished earflap hat for a certain little cutie (pattern from Last Minute Knitted Gifts).
 :: my famous brown sugar shortbread
 :: Eleventh Hour Scarf
 :: Cowgirl Cookies from Bakerella
And a few more small projects that will be ready just in the nick of time. Happy holiday crafting!
Mom's Garden: Before and After
Last year my parents sold their house, which was located on about one acre of property. The maintenance of their yard and gardens was becoming a lot of work and they wanted something more manageable where they could relax and enjoy their retirement.
For my mom, the new house presented a blank slate for new flower gardens. Nothing had been planted or maintained, other than a few tired-looking perennials that were ready for the compost pile. The existing flowerbeds in the front and back yards were overgrown with weeds. Mom started by digging up the few scraggly perennials that were still struggling out of the unkempt beds bordering the backyard and planted new beds. The "before" photo...
 After she cleared out the old plants and weeds, she dug new beds and enriched them with better soil and compost:
 Next came planning. Many lists were made. Much time was spent observing the light and shade of the new garden. Then she started planting. There were many, many trips to garden centres to get healthy new plants. Here's how it looks one year later:
 Gorgeous. Lush, green, colourful, and thriving. She's got the greenest thumb I ever saw. Here's another before/after, looking at a back corner of the yard:

 And this is only the BACK yard. Next post will show the front yard - plus the new potting shed. Great job, Mom!
For my mom, the new house presented a blank slate for new flower gardens. Nothing had been planted or maintained, other than a few tired-looking perennials that were ready for the compost pile. The existing flowerbeds in the front and back yards were overgrown with weeds. Mom started by digging up the few scraggly perennials that were still struggling out of the unkempt beds bordering the backyard and planted new beds. The "before" photo...
 After she cleared out the old plants and weeds, she dug new beds and enriched them with better soil and compost:
 Next came planning. Many lists were made. Much time was spent observing the light and shade of the new garden. Then she started planting. There were many, many trips to garden centres to get healthy new plants. Here's how it looks one year later:
 Gorgeous. Lush, green, colourful, and thriving. She's got the greenest thumb I ever saw. Here's another before/after, looking at a back corner of the yard:
 And this is only the BACK yard. Next post will show the front yard - plus the new potting shed. Great job, Mom!
Knitting for babies
 A few new projects on the needles: a baby blanket, using colours that we'll be using for the baby's room (I think). The pattern is from Debbie Bliss's new book, "Blankets, Bears and Booties" and the yarn is Baby Cashmerino. It's the first time I've used this popular yarn, and I have to say that it's the softest, coziest yarn I've ever knit with. I love it. I can see that I'll be using it for more projects in future.
 Here's a peek at the blanket from the book. Look at that cute little mouse in matching stripes! I am a sucker for stripes on kids. I'm modifying the blanket pattern slightly to make it bigger. I started knitting it as per the pattern directions, but soon realized that the finished blanket would only be about the size of a dish towel. So I cast on about double the number of stitches, and I think it will be the right size for tucking around a little one in the stroller or carseat.
 Here's another sweet pattern that I'll be making up (in different colours) for my goddaughter. The adorable photos in this book are enough to make me want to knit everything in it. There are booties, sweaters, toys and even a beanbag chair that looks like a big bird - all modelled by the most beautiful babies you ever saw. Definitely recommended.
My So-Called Scarf
 I made the popular "So-called Scarf" as a little gift for a friend of mine who appreciates a nice, handknit wool accessory.
I like the herringbone pattern and once I got going, I found it to be an easy knit. I followed a tip from someone on Ravelry who found a YouTube clip showing a slightly easier way to knit it and get the same result. It took two skeins of Manos del Uruguay to make a scarf long enough to wrap twice around the neck (shown here wrapped just once around the neck of my ever so patient husband).

Next on the list of knitting WIPs: some baby knits, including a striped blanket and a few other wee goodies for the new little one who'll be arriving here in the spring!
Halloween fun, part 2

Halloween came and went, leaving behind discarded pumpkins and leftover mini chocolate bars (which seem to get mini-er every year). There seems to be fewer and fewer kids trick-or-treating every year, too. I'm not sure why that is - maybe they have more Halloween parties and don't bother walking around to collect their treats?
Regardless, we decorated the house with bats and pumpkins made of black and orange construction paper. We also carved two pumpkins, "one with a scary face, and one with a scaredy face," per Ronan's request.
I also made two pumpkins which I can use year after year - these ones made out of wool roving and yarn, with twigs for the stems. I saw these in an old Martha Stewart magazine and have been wanting to make them for a while. They were quick and easy - just strips of yellow and orange roving wrapped around styrofoam balls, and fuzzy orange yarn wound around them to hold the roving in place. A dab of hot glue holds the stem to the top of the pumpkin.
I made one pumpkin according to the directions - with the fuzzy orange yarn wrapped around it to hold the roving in place. But I made the second one with just the roving and it didn't seem to need the yarn. I'm not sure which one I like better.

Actually, my most favourite little pumpkin is this one:

Happy Halloween!
Halloween fun
Today was a really perfect fall day. Crisp and sunny and full of autumnal colour. I really do love fall, and this year, we seem to be getting a nice long season.
After a few hours out in the backyard, we came in to make some Halloween crafts. We found some great ideas on Martha Stewart's website (her Halloween ideas are the most creative I've ever seen on the 'Net).

These candles are fast and inexpensive to make with a few sheets of orange and yellow tissue paper wrapped around glass cylinder vases (mine were about 5x12 inches, $1 each at a dollar store). I used a utility knife to cut out the faces and then put a tealight in each one.

The Angry Chicken's recent post about Halloween crafts included a free download so we made some pumpkins with cut-and-paste faces. Also fun and easy.
I made a few other things, but will have to get some better pictures before I can post them. And of course we will have a shot of this year's Halloween costume later this week.
After a few hours out in the backyard, we came in to make some Halloween crafts. We found some great ideas on Martha Stewart's website (her Halloween ideas are the most creative I've ever seen on the 'Net).

These candles are fast and inexpensive to make with a few sheets of orange and yellow tissue paper wrapped around glass cylinder vases (mine were about 5x12 inches, $1 each at a dollar store). I used a utility knife to cut out the faces and then put a tealight in each one.

The Angry Chicken's recent post about Halloween crafts included a free download so we made some pumpkins with cut-and-paste faces. Also fun and easy.
I made a few other things, but will have to get some better pictures before I can post them. And of course we will have a shot of this year's Halloween costume later this week.
Chicken Potpie

Hello! I'm fully aware that I've been neglecting this blog lately. That's because I haven't made anything in a long time. But I can feel the creative juices starting to flow again. Probably because it's fall and now I want to knit things and bake things and just basically do things that make me feel warm and cozy.
Since I haven't got any new crafts to show (yet), I'm offering a recipe for Chicken Potpie instead. I've given out this recipe a lot. Once people eat it at our house, they want to make it themselves. It's that good. I honestly don't think I've ever eaten a store-bought version of chicken potpie that tastes as good as this one. I often make this with leftover turkey after Thanksgiving or Christmas, so it seems like a good time to post here - I bet there will be a lot of turkey sandwiches in lunch bags this week!
Usually I make individual potpies in little aluminum pieplates, with a top and bottom crust. They freeze really well. I don't bake them before I freeze them. I just put the cooked filling into the piecrust-lined pans, add the top layer of piecrust, seal the edges, and put them into little Ziploc bags for the freezer. Then when we want them for dinner, I just take the frozen pies out of the plastic bags, put them on a foil-lined tray (to catch any drips) and bake.
The version shown above, made in a cute vintage Pyrex casserole dish, has only a top crust and it's just as good this way. And takes less time because you don't have to roll out circles of dough and press into individual pans. This is not a quick weeknight recipe, but more of a weekend dinner when you've got time to make pastry. And yes, you could buy frozen pastry but it won't taste the same. You've been warned.

Chicken Potpie
Serves 4
Filling:
1 cup onion, chopped
1 cup sliced fresh mushrooms
2 tbsp butter
1/3 cup flour
1 tsp poultry seasoning
1 tsp dried thyme
1/4 tsp black pepper
1.5 cups chicken broth
1 cup milk
1 cup carrots, thinly sliced
2 large potatoes, cut into small cubes
1 cup peas
2.5 cups chopped cooked chicken (or turkey)
Pastry:
3 cups all purpose flour
1 tsp salt
1/4 tsp baking powder
1 1/4 cups cold butter, cubed
cold water
Make pastry first: In a food processor, blend together flour, salt, and baking powder. Add cubed butter. Pulse until mixture looks like coarse crumbs. Slowly add cold water, a tablespoon at a time, and pulse repeatedly until mixture just holds together. It should not be wet but should stick together when you press it between your fingers. Turn out onto a large piece of plastic wrap and gently form dough into a flat (2-inch thick) oval. Wrap in plastic and put into fridge to chill while you make the filling.
To make filling, melt butter in a large pot. Add onion and mushrooms. Saute over medium heat until vegetables are tender. Sprinkle flour, poultry seasoning, thyme and black pepper over vegetables. Cook and stir for 2 minutes. Add chicken broth, milk, carrots, and potatoes. Cook and stir until sauce is thickened and bubbly, and carrots and potatoes are tender. Add chicken and peas and remove from heat.
If you're making this in a casserole dish with a single crust on top, just pour the filling into a 2 quart baking dish. Roll out enough pastry to cover the top of the pie (about half of the pastry - you can freeze the rest for next time). Turn edges of pastry under and cut a couple of slits in the top to allow steam to escape while baking. Place on a foil-lined baking sheet (to catch any drips) in centre of oven; bake at 400 degrees for 30-40 minutes, until crust is golden and filling is hot and bubbly.
If you're making individual pies, roll out half the pastry. Cut four circles that will fit your pie pans (some are round, some are oval - just cut to fit your pans). Place dough in pie pans. Add filling. Roll out remaining dough and cut four more circles to fit the tops of the pies, remembering to cut these slightly larger as you will need a little extra to turn under the edges. Turn under the edges of the crust; press with a fork all the way around to seal the crusts. Cut a little slit in the top to allow steam to escape. Follow baking directions above OR slide unbaked pies into plastic Ziploc bags and freeze for later use.
**If baking from frozen, I recommend using a lower heat to avoid browning the crust too quickly before the filling is heated through. I bake frozen pies at 350 degrees for one hour.
Barbie goes camping
 Barbie dolls were definitely my favourite toys for a number of years. I can't remember how old I was when I got my first one, or how old I was when I stopped playing with them, but I do remember that I had a lot of cool Barbie stuff and it was endlessly entertaining. Among the awesome accessories I owned: Barbie's horse (it was named Dallas - does anyone else remember that??); the motor home (which was bright yellow and huge - at least 2 or 3 feet long); a hot tub that could be filled with water and produced bubbles; a pink Jeep that came with camping gear; and of course, a dozen different Barbie dolls. All of whom ended up with their hair cut off. I always regretted those haircuts later. (Which weirdly foreshadowed the relationship I now have my own hair - cut it short, let it grow, cut it shorter, let it grow...)
My mom made a lot of Barbie clothes for my dolls, including a complete wedding ensemble with a veil and a bouquet that had a tiny elastic strap to hook over Barbie's wrist. Mom, how did you have the patience or time to make that stuff? I also remember hand-sewn quilts and pillows for Barbie's canopy bed (pink, natch), and other assorted furnishings for the Barbie condo. But the best thing she ever made for Barbie was undoubtedly the tent.
Mine was the perfect shade of Barbie pink with two sleeping bags, fully lined with flannel and quilted to make them look like the real thing. There were even little pillows stitched into the sleeping bags. As if Barbie would sleep in a tent without a pillow - seriously, now.
 No detail was overlooked. The tent featured a rear window with a mesh panel to keep out mosquitoes, and flaps on the window and front opening that could be rolled up and secured with a button, or left down when Barbie wanted a little privacy.
 A wooden dowel propped up the tent when in use and when it was removed, the whole tent folded down, nice and flat. It made it easy to shove under the bed when it wasn't being used.
 Look - the sleeping bags, folded up and tucked a certain way, can be converted to chairs! Awesome!
Even my younger brother had a tent. His was dark brown with plaid-flannel lining in the sleeping bags. Very masculine. His was inhabited by assorted action figures including G.I. Joe, a Spiderman doll, and a Wayne Gretzky doll (who sometimes visited Barbie for a "sleepover"). (Sorry, Kev, you may not have been aware of Barbie's relationship with Wayne.)
 Recently my mom busted out the Barbie tent pattern again. However, the fabric she uses is a bit tricky to find these days. It's a stretchy type of polyester that used to come in a rainbow of colours and it was perfect for the tents. I suspect it was also popular for women's pants with elastic waistbands...but let's not think too hard about that.
DIY yarn swift

Last Christmas, John bought me a ball winder for yarn, which I love, but at the time, neither of us realized that I would also need a yarn swift to actually use it for winding balls of yarn. The winder cost about $25 but an umbrella-style swift is approximately $80 - $100. I guess it's not terrible, considering you'd probably only buy one of these things in your lifetime...but still, $100? I haven't been able to convince myself that I need one THAT badly. Not when I can still wind yarn into balls the old-fashioned way - by hanging the skein of yarn on the back of a kitchen chair, or sometimes by persuading people (like John) to hold the yarn on their hands while I wind it up.
But then...finally! I saw an idea for making your own swift out of Tinker Toys. Seriously! I thought, well, why not? And this was the result:


Ronan was almost as excited about it as me. Almost. He was the one who added the decorative stack of cylinders to the centre post.
Note: Swifts like the one I made (albeit made of wood and not Tinker Toys) are available on ebay for half the cost of the umbrella style.
Bags for spring
Spring is coming...slowly but surely. The signs are everywhere. Tulips and crocuses are peeking out of flowerbeds. People are outside more and smiling more - walking their dogs, washing their cars, cleaning their yards. Yard sale season is starting. Stores of full of garden tools, lawn chairs, and pastel T-shirts.
This is the time of year that my mom pulls out all her gardening books and begins to plan, in earnest, the flower and vegetable gardens. It's still too early to plant. But never too early to plan.
While she waits to dig into the gardens, she sews. Lately, a flurry of floral totes have been flying off the machine. Each one is different, but all very springlike, don't you think?


Did you notice the new addition to the bags? We finally have custom labels to sew into them. Here's a closer look:

After much experimentation and hunting for the right materials and instructions, I finally found a great tutorial at sewtakeahike. So cool.
This is the time of year that my mom pulls out all her gardening books and begins to plan, in earnest, the flower and vegetable gardens. It's still too early to plant. But never too early to plan.
While she waits to dig into the gardens, she sews. Lately, a flurry of floral totes have been flying off the machine. Each one is different, but all very springlike, don't you think?


Did you notice the new addition to the bags? We finally have custom labels to sew into them. Here's a closer look:

After much experimentation and hunting for the right materials and instructions, I finally found a great tutorial at sewtakeahike. So cool.
Pleated Beauty Bag

My mom made me a new bag using the pattern from Amy Karol's book, Bend-the-Rules Sewing. It's very cute, no? She used very fine wale corduroy for the body and a paisley cotton for the lining inside the bag and the pleats. Hence the name, Pleated Beauty Bag. Here's a closer look at the pleated part:

And here's the "beauty" part:

I really like that paisley lining. A lot. The icing on the cake is this wallet she made to go with the bag:


She is the best mom EVER.
Cable love

I love knitting cables. I try to knit other things, but I keep coming back to cables. Love those serpentine patterns with those alternating twists and turns; love the many variations that look so complex but really aren't; and most especially I love the finished fabric with all its texture and weight. Even a fine, delicate yarn can be made into a thick, warm hat or scarf if you knit it up into cables. I would love to make a cable-knit sweater one of these days. I really like this pattern. Or maybe this one. And I'm also pretty excited about this. You get the picture.
I haven't knitted many things for my mom. This is partly due to the fact that she can't wear wool ("It itches!!") and partly due to the lack of great cotton yarns at my local yarn shop. (Yes, I know yarn can be found online, but I like to choose yarn from an actual store where I can see and touch the yarn. Call me crazy.) And then I found this great organic cotton yarn at a LYS here in St. Catharines. They didn't have a lot of colours in the store, but this raspberry red caught my eye. A single skein went on and on and on...it only took a couple to make this scarf and hat.
The patterns aren't particularly complicated. The scarf is from One Skein: 30 Quick Projects to Knit or Crochet by Leigh Radford. However, I will say that I took some liberties with the pattern so it's not exactly the same. The hat is from Stitch 'n Bitch Nation by Debbie Stoller (again, liberties were taken). This is the third cabled hat I've knitted...it might be time to take the leap and make a sweater.
Subscribe to:
Posts (Atom)